
Choose a large container with drainage
- Choose a large container with drainage. Picking the right sized pot can determine whether or not you’ll be successful at growing okra in containers. Okra has large taproots, so you need a pot that can contain them.
- Make sure the pot is at least 3 gallons in size, but the ideal size is 5 gallons, measuring at least 10-12 inches deep and similar in diameter.
- Ensure there are drainage holes in the bottom of the container and line it with gravel to let the excess water drain out of the soil. It’s best to have a plate or tray underneath the pot.
Place okra containers in the right location
Okra wants well-draining soil; soggy feet can lead to rotting and death of your plants. To fill your containers, a soilless potting mix full of organic matter is a fantastic choice.
- Aim for a loamy, crumbly soil.
- Make sure you add plenty of compost or aged manure before you put the plant into the compost. The plant needs a constant supply of nutrients.
- It’s best if the soil has a neutral pH range of 6.5 to 7.0, although they can survive in soil with a pH as high as 7.6.
- Make sure you use potting soil, not topsoil or garden soil. Potting soil is light and loose, and topsoil will become packed down, interfering with drainage and root growth.
Watering your Okra
Okra plants need uniformly moist and slightly moist soil. You should water your plants regularly. While okra plants can withstand dry spells, they grow the best if they receive 1 inch of water each week.
- More water is needed at the beginning of the flowering period and until the end of the production.
- Make sure you check the soil before you water. If it’s wet two inches down, it doesn’t need to be watered, but if it’s dry, it’s time to water your plants.
- Once your plants are established, you only need to water weekly, but do so deeply.
Fertilizing Needs for Okra Plants
In the beginning, you should mix composted manure or compost into the soil to provide nutrients to your plants. You also can side-dress your plants with compost throughout the growing season for additional nutrients.

- Another option is to add a balanced, granular fertilizer at the time of planting. Mix it into the soil well.
- When the plant is 6 inches tall, you can apply another dose of balanced fertilizer.
- Make sure your soil doesn’t contain too much nitrogen because it can encourage excess vegetative growth rather than focusing on fruiting. You want a balanced soil.
- Later in the growing season, try feeding your plant a fertilizer that is low in nitrogen. Look for an NPK ratio of 5-10-15 or 6-12-12.
Harvesting Okra Grown in Containers
The most important thing to know is that okra plants require frequent and regular harvesting. It takes around 2-3 months after planting for blooms to appear. Once the flowers appear, expect another week before fruits appear.
Okra is a cut and come again plant. They flower nearly every day, and each flower will self-fertilize itself, so you don’t need to worry about pollination. Once flowering, it takes 7-10 days to fruit.
You want to pick the pods when they’re tender. If you wait too long, they become fibrous, making it too hard to be eaten. Aim for each pod to measure between 3-5 inches long.
- The first pods that you can harvest appear at the base of the plant and gradually move upwards. At the end of the growing season, you’ll harvest from the top of the plant.
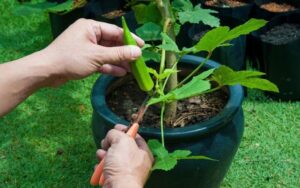
- Use pruning shears to cut the pods away from the plant.
- You need to make sure you check the plant each day. All it takes is a day or two extra on the plant, and the pods become hard and woody, nearly inedible.
- Be aware that they have stiff hairs that will cook off later unless you grow spineless okra. It’s a smart idea to wear gloves and a long-sleeved shirt since it’s not comfortable to be stuck with the hair.
Common Pests & Diseases That Bother Okra
Okra doesn’t deal with too many pests and diseases; the biggest problem this veggie typically faces is cold weather, but you should be prepared to deal with whatever comes your way.
Fusarium Wilt
Here is another fungal infection that can quickly destroy your crop. Over time, the leaves become necrotic, with the older plants showing signs of wilting first. Severe infections can cause your plants to become stunted and eventually die.
Fusarium wilt tends to develop more in warm temperatures, and there is no way to get rid of the fungus.
Charcoal Rot
With this fungal infection, you’ll notice discoloration of the stem at the soil line, and over time, cankers might spread upwards. It causes the leaves to wilt and eventually drop off of the plant.
Unfortunately, once infected, you cannot get rid of this fungus. It’s best to practice crop rotation to avoid it developing in the soil.
White Mold
This other fungus causes a cottony fungal growth on your plant, along with small, dark green lesions on the pods, branches, and leaves. Over time, the lesions get longer. White mold can live up to 5 years in the soil.
Make sure you rotate your crops and avoid excess nitrogen fertilizer. It’s also best to space the rows wide.
Cucumber Beetles
If your plants are infected with cucumber beetles, you’ll find stunted seedling and damaged leaves. The symptoms often look like bacterial wilt, and there will be scars on the fruit. Cucumber beetles are typically brightly colored with either a green-yellow background and black spots.
You can use floating row cover to protect your plants, and kaolin clay applications are effective in getting rid of small infestations. Applications of insecticides can be helpful.
Loopers
These pests cause large or small holes in the leaves; the damage is often extensive. Cabbage loopers are pale green with white lines on either side of the body. You can typically hold the loopers in check by using natural enemies. Another option is applying Bacillus thuringiensis to kill young larvae.
Root-Knot Nematode
These will lead to galls on the roots, which leads to a reduction in plant growth. They also can cause the plants to yellow in hot weather. Nematodes prefer sandy soils, and make sure you plant resistant varieties if you think they might be present in the soil.
Check the roots in the middle of the growing season if you suspect nematodes. Solarizing the soil can reduce nematode populations.
Final Thoughts
Learning how to grow okra in containers is a simple task for new gardeners. They grow well in most regions, and if you live in a climate that gets cold, growing okra in pots is a smart idea because you can bring it inside if the temperatures get too chilly.


